
Before computers, we had switchboards. An operator would receive your call, ask who you wanted to reach, physically connect your line to theirs with a patch cable, and you’d talk. When you hung up, the connection was torn down. Request-reply in its purest form: synchronous, blocking, one conversation at a time.
The telephone system evolved. Direct dialing replaced operators. Trunk lines multiplexed thousands of calls. Voicemail let you leave a message with a return address (your number) so someone could call you back later. Conference calls implemented recipient lists. Call waiting was an early form of bulkheading, preventing one call from completely blocking your line.
Every pattern we’ll cover today has roots in that century of telecommunications engineering. The problems are the same: how do you connect parties, route messages, handle failures, and scale to millions of concurrent conversations?
Today we’re tracing an evolution that happens in almost every successful platform: starting with a simple synchronous API, scaling it into an async system with webhooks, and finally building out a full enterprise event delivery platform. Along the way we’ll hit Request-Reply, Scatter-Gather, Polling Consumer, Return Address, and Recipient List.
Starting Simple: Synchronous Request-Reply
The most basic integration pattern is synchronous request-reply. Like picking up the phone, dialing, and waiting for someone to answer:
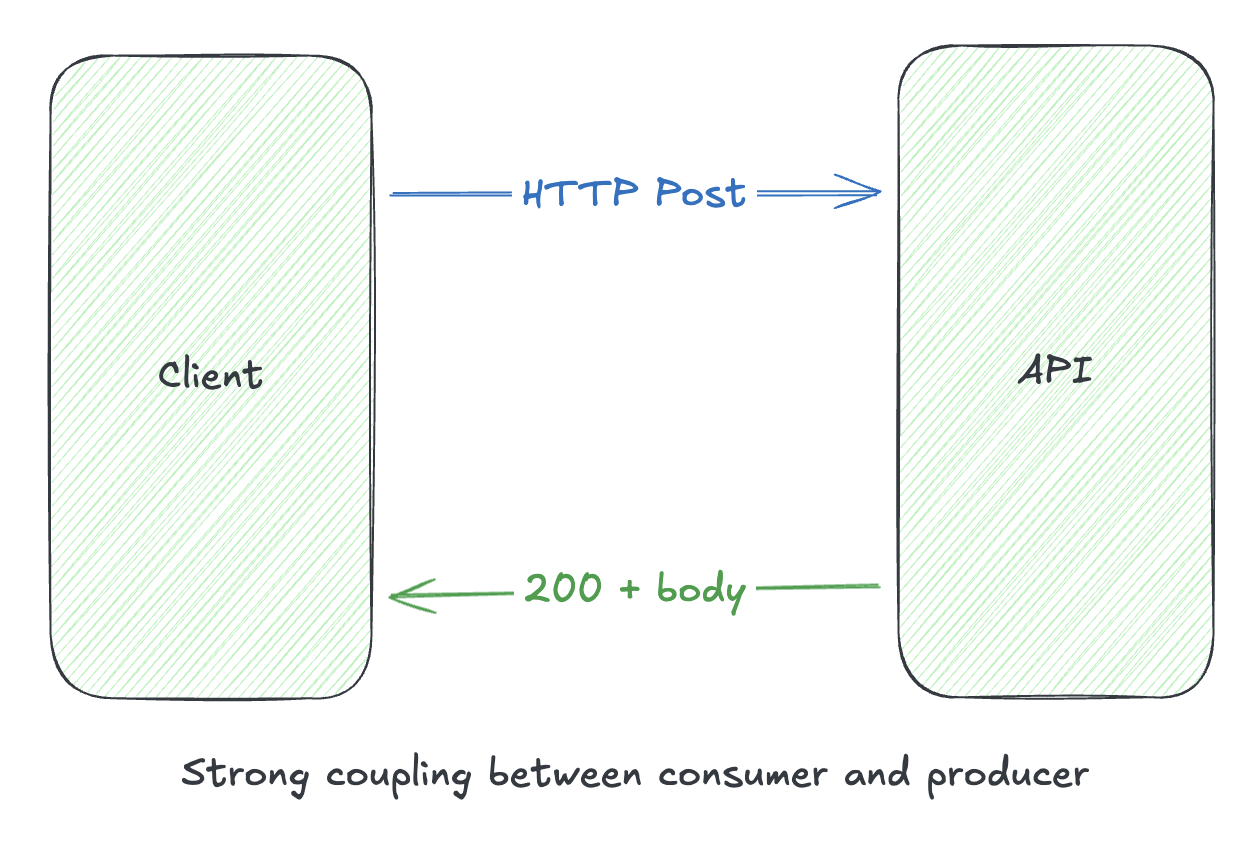
Nothing fancy. Your REST API, your GraphQL endpoint, your gRPC service. The client blocks until the server responds.
import gleam/http/request
import gleam/httpc
import gleam/json

/// Simple sync request-reply: block until we get a response
pub fn check_approval(application_id: String) -> Result(ApprovalResult, Error) {
  use response <- result.try(
    request.new()
    |> request.set_host("api.lender.com")
    |> request.set_path("/api/v1/approvals")
    |> request.set_method(http.Post)
    |> request.set_body(json.to_string(ApprovalRequest(application_id)))
    |> httpc.send
  )

  json.decode(response.body, using: approval_decoder())
}
This works great when:
- Operations complete in milliseconds to low seconds
- The caller can afford to block while waiting
- Failures are simple (retry or error)
But what happens when the operation takes longer? What if you need to aggregate data from multiple sources?
Sync Frontend, Async Backend: Scatter-Gather
We touched on Scatter-Gather back in Day 4 when covering routing patterns. Here’s a practical illustration of why it matters.
Your API needs to check credit scores from three different bureaus before approving a loan. Each bureau has different latency:
- Equifax: ~200ms average
- Experian: ~350ms average
- TransUnion: ~180ms average
Serial execution: 200 + 350 + 180 = 730ms minimum
Parallel execution: max(200, 350, 180) = 350ms (limited by slowest)
That’s a 2x improvement just by running requests concurrently. But the impact at scale is even more dramatic. Little’s Law, derived from Agner Erlang’s foundational work on telephone trunk line capacity, tells us:
$$\lambda = \frac{L}{W}$$
Where:
- $\lambda$ = throughput (requests/second)
- $L$ = concurrency (parallel requests in flight)
- $W$ = latency (seconds per request)
If your system can handle $L = 100$ concurrent requests:
| Mode | Latency ($W$) | Throughput ($\lambda = L/W$) |
|---|---|---|
| Serial | 0.73s | $100 / 0.73 = 137$ req/s |
| Parallel | 0.35s | $100 / 0.35 = 286$ req/s |
Same infrastructure, same concurrency limit, but 2x the throughput because each request occupies a slot for half the time. Erlang figured this out for telephone switches in 1909. We’re still using the math.

The client sees a synchronous API. Behind the scenes, the server fans out requests in parallel and aggregates the results:
import gleam/otp/task
import gleam/list
import gleam/int

pub type CreditScore {
  CreditScore(bureau: String, score: Int)
}

/// Scatter-gather: fan out to all bureaus in parallel, collect results
pub fn check_credit_parallel(ssn: String, timeout_ms: Int) -> Result(Int, Error) {
  // Scatter: spawn concurrent tasks
  let tasks = [
    task.async(fn() { equifax.check(ssn) }),
    task.async(fn() { experian.check(ssn) }),
    task.async(fn() { transunion.check(ssn) }),
  ]

  // Gather: await all with timeout, keep successful results
  let scores =
    tasks
    |> list.filter_map(fn(t) { task.try_await(t, timeout_ms) |> result.ok })

  case scores {
    [] -> Error(NoScoresRetrieved)
    _ -> Ok(average(scores))
  }
}

fn average(scores: List(CreditScore)) -> Int {
  let total = list.fold(scores, 0, fn(acc, s) { acc + s.score })
  total / list.length(scores)
}
Notice what the client sees: a simple synchronous API. They don’t know or care that the backend is doing parallel async work. The scatter-gather complexity is hidden behind that familiar request-reply interface.
Capacity Planning for Fan-Out
Here’s the catch: every incoming request spawns $N$ outbound requests. At scale, this multiplier effect can exhaust resources fast.
$$\text{Outbound connections} = \text{Concurrent requests} \times N$$
With 500 concurrent loan applications and 3 credit bureaus each:
$$500 \times 3 = 1{,}500 \text{ simultaneous outbound connections}$$
Naive “spawn a task per request” doesn’t scale. You need:
Connection pooling: Reuse HTTP connections to downstream services rather than establishing new ones per request. Most HTTP clients support this, but you need to size pools appropriately.
// Configure connection pool per downstream (using hackney/httpc pooling)
let equifax_client = httpc.new()
  |> httpc.with_pool("equifax", size: 100)
Backpressure: When downstream services slow down, don’t let requests pile up unbounded. Use OTP’s built-in primitives to limit concurrent fan-out.
import gleam/otp/actor
import gleam/otp/supervisor

/// Rate-limited credit checker using actor mailbox as natural backpressure
pub fn start_credit_checker() {
  actor.start(CheckerState(pending: []), handle_message)
  |> supervisor.add_child(restart: Transient)
}

/// Mailbox depth naturally limits concurrency -
/// callers block when mailbox is full
pub fn check_credit(checker, ssn: String) {
  actor.call(checker, CheckCredit(ssn), timeout_ms: 5000)
}
Circuit breakers per downstream: If Experian is failing, don’t let it poison every request. Trip the circuit and return partial results (2 of 3 bureaus) rather than failing entirely.
Rate limiting: Some downstream APIs have rate limits. A pool of 1,000 connections is useless if the API only allows 100 req/s. Build rate limiting into your client.
The scatter-gather pattern is powerful, but the fan-out multiplier means capacity planning is essential. This is often where teams decide to move scatter-gather behind an async boundary, which brings us to…
When Sync Isn’t Enough
But some operations genuinely take too long for a synchronous response:
- Document processing that takes minutes
- Background checks that require human review
- Batch operations on thousands of records
- External processes with SLAs measured in hours
For these, we need true async patterns.
Async Request-Reply: Two Approaches
When you can’t respond immediately, you have two options for delivering results:
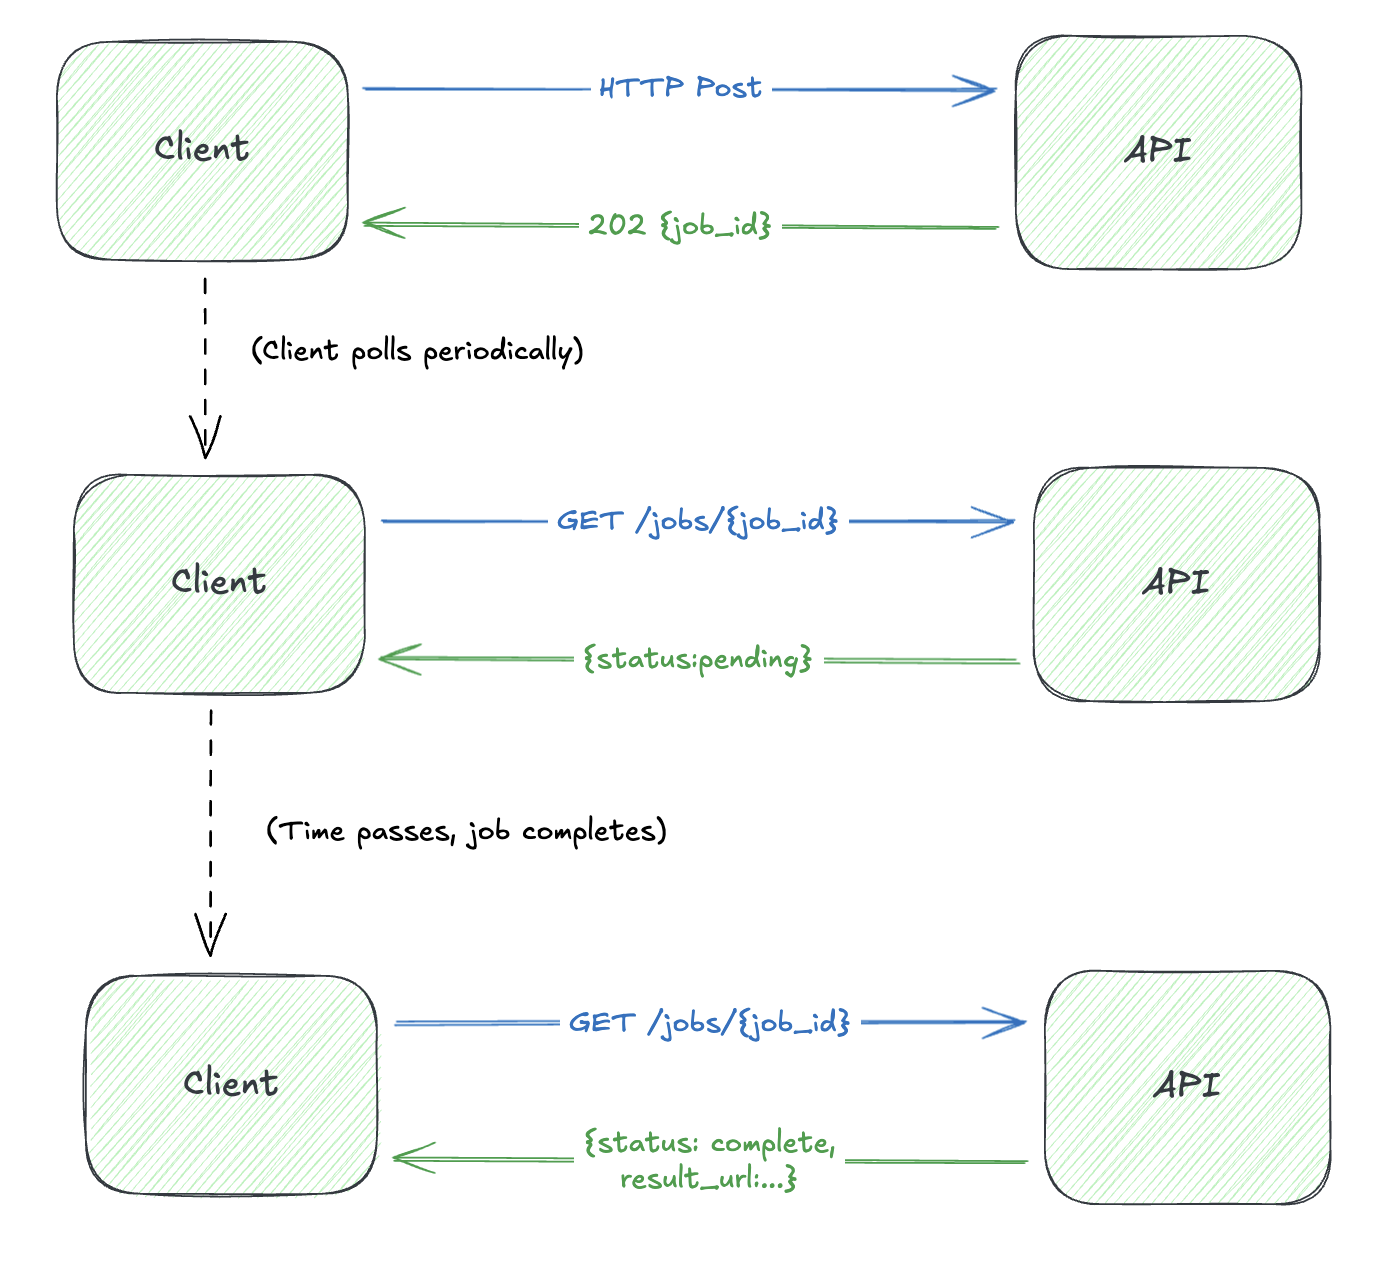
Option 1: Polling Consumer
The client initiates the request, gets back a job ID, then polls for status:
import ids/uuid

pub type JobStatus {
  Pending
  Processing
  Complete(result_url: String)
  Failed(reason: String)
}

/// Start async job - return immediately with job ID for polling
pub fn create_background_check(applicant_id: String) -> String {
  let job_id = uuid.v4()

  // Persist job, queue work, return ID
  jobs.insert(job_id, Pending)
  queue.publish("background-checks", job_id, applicant_id)

  job_id
}

/// Client polls: GET /jobs/{id}
pub fn get_status(job_id: String) -> Result(JobStatus, Nil) {
  jobs.lookup(job_id)
}

/// Worker callback when processing completes
pub fn mark_complete(job_id: String, result_url: String) {
  jobs.update(job_id, Complete(result_url))
}
Polling is simple and works everywhere, but it’s inefficient. Clients waste resources checking for updates that haven’t happened.
The Math: Polling vs Push
Let’s quantify the inefficiency. Assume:
- Job takes T seconds to complete (variable, unpredictable)
- Client polls every P seconds
- You have N concurrent jobs
Polling load on your API:
$$\text{Requests} = N \times \frac{T}{P}$$
Example with $N = 1{,}000$ concurrent jobs, $T = 60\text{s}$ average completion, $P = 5\text{s}$ poll interval:
$$\text{Requests} = 1{,}000 \times \frac{60}{5} = 12{,}000$$
Only 1,000 of those return useful data. Waste ratio: $\frac{11{,}000}{12{,}000} = 91.7%$
Push load:
$$\text{Requests} = N$$
With $N = 1{,}000$ completed jobs: Requests = 1,000. Waste ratio: 0%
The longer jobs take and the more aggressive your poll interval, the worse polling gets:
Polling waste by job duration (poll interval = 5s):
| Job Duration | Polls per Job | Wasted Polls | Waste % |
|---|---|---|---|
| 10 seconds | 2 | 1 | 50% |
| 30 seconds | 6 | 5 | 83% |
| 60 seconds | 12 | 11 | 92% |
| 5 minutes | 60 | 59 | 98% |
| 1 hour | 720 | 719 | 99.9% |
Push inverts the equation: you only send requests when there’s data to deliver.
Option 2: Push Notification (Return Address)
Instead of polling, the client provides a callback URL. When the job completes, the server pushes the result:
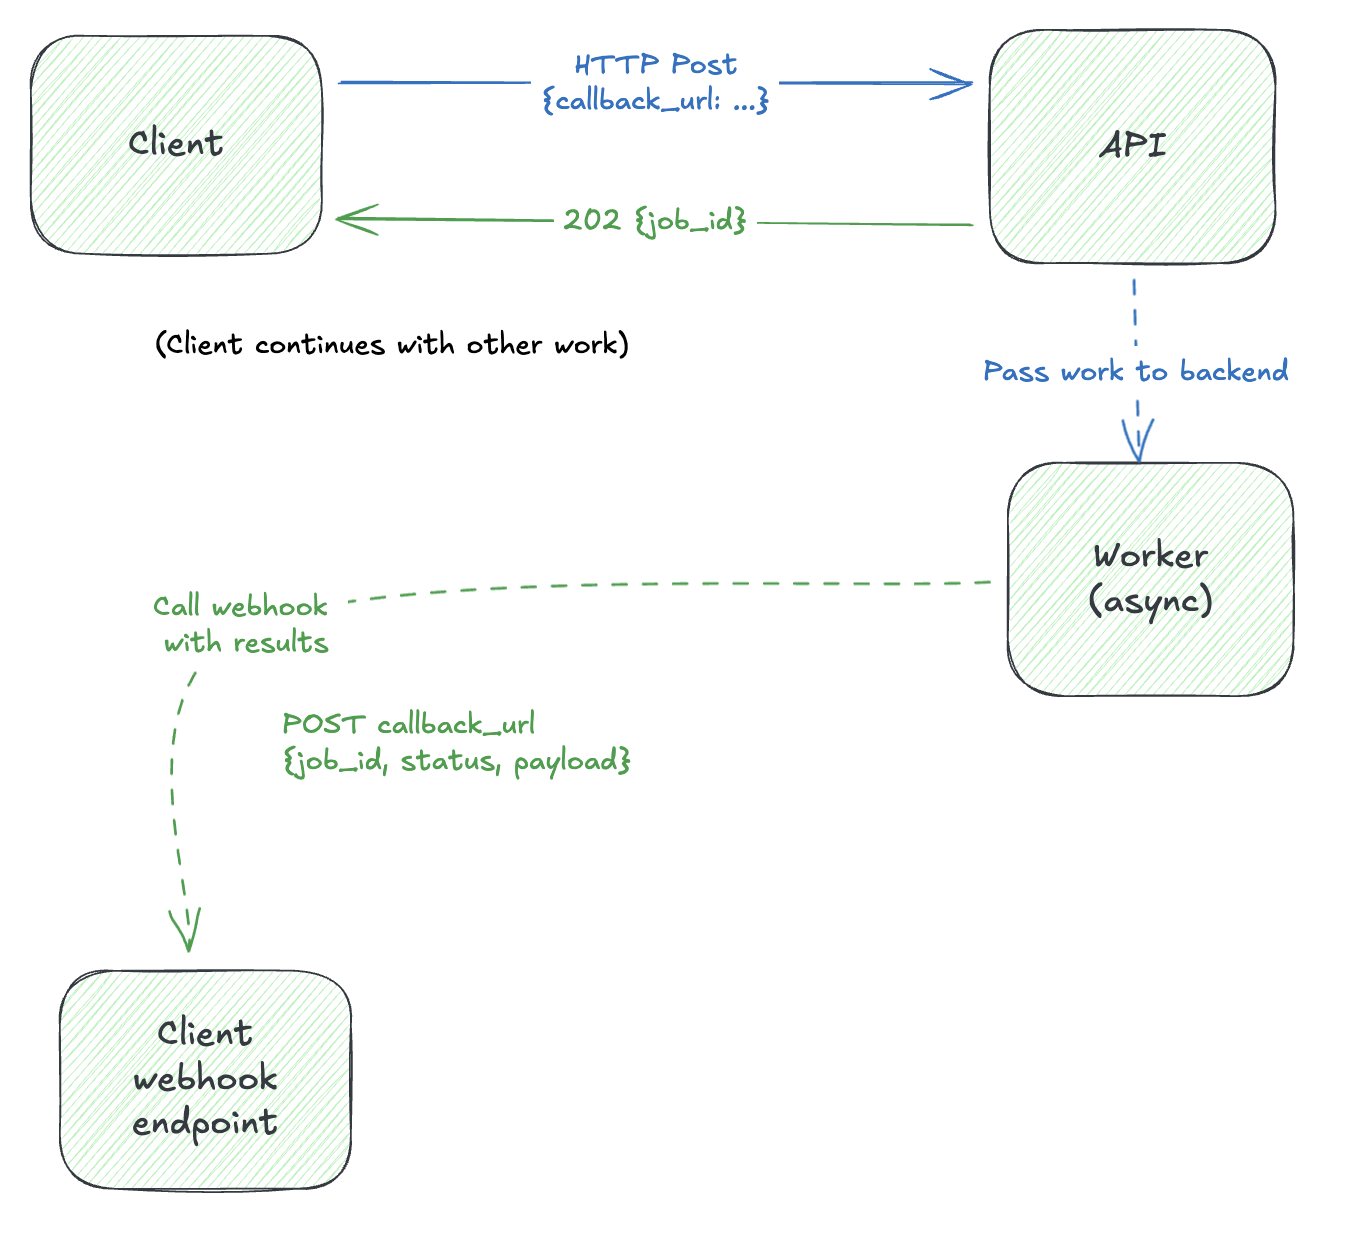
This is the Return Address pattern. The request includes where to send the reply.
Correlation: Tying It Together
Remember the Correlation Identifier pattern from yesterday? It’s essential here. When a webhook arrives at your callback URL, you need to know which request it belongs to:
import gleam/option.{type Option, None, Some}
import gleam/crypto

pub type JobRequest {
  JobRequest(
    applicant_id: String,
    correlation_id: String,       // Client-provided for matching
    callback_url: Option(String), // Return address (None = polling)
  )
}

/// Deliver result via webhook or mark for polling
pub fn deliver_result(job: JobRequest, result: String) {
  case job.callback_url {
    None ->
      // No callback - client will poll
      jobs.update(job.correlation_id, Complete(result))

    Some(url) ->
      // Push to return address with correlation_id echoed back
      webhook.deliver(url, WebhookPayload(
        event: "job.completed",
        correlation_id: job.correlation_id,
        data: result,
      ))
  }
}
Push is more efficient, but now you need:
- Webhook signature verification
- Retry logic for failed deliveries
- Idempotency handling on the client side
Client-Side: Using Correlation ID
On the receiving end, the client uses correlation_id for two critical purposes:
import gleam/http/response

/// Client-side: handle incoming webhook
pub fn handle_webhook(payload: WebhookPayload) -> response.Response(String) {
  let dedupe_key = payload.correlation_id

  // 1. Dedupe - webhooks may retry, don't process twice
  use <- guard(when: cache.has(dedupe_key), return: response.new(200))

  // 2. Correlate - match to original request
  use ctx <- result.try(pending_requests.lookup(payload.correlation_id))

  // 3. Process and mark done
  process_result(ctx, payload.data)
  cache.set(dedupe_key, ttl_hours: 24)

  response.new(200)
}
The correlation_id is the thread that connects the original request to its eventual response, even when they’re separated by minutes, hours, or service restarts.
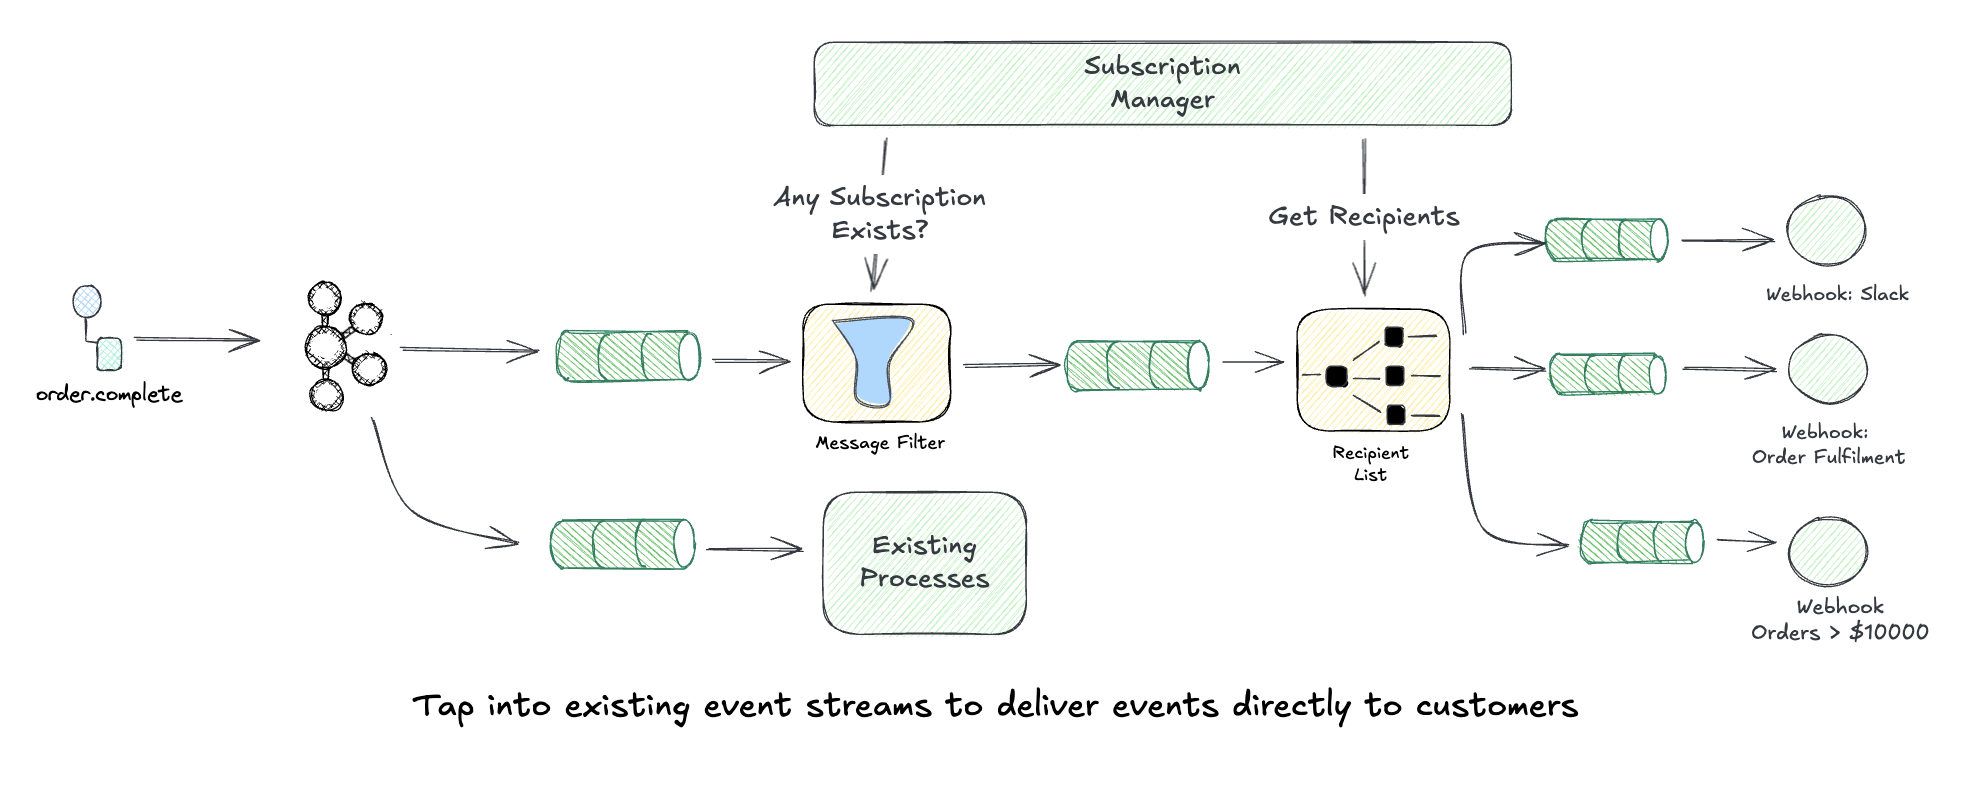
Recipient List: Dynamic Webhook Destinations
Here’s where it gets interesting. What if clients want to receive events at multiple destinations? What if they want to filter which events go where?
The Recipient List pattern lets you route messages to a dynamically configured set of receivers:
The Webhook Management Plane
Before you can route events, customers need a way to manage their subscriptions. This requires a subscription management API: the control plane where webhooks are created, updated, and deleted.
Build the API first. Your admin dashboard becomes just another client:
Subscription API: CRUD operations for webhook endpoints. Subscribe, unsubscribe, update event filters, rotate secrets. Authenticated per-customer, scoped to their resources.
Admin Dashboard: A UI wrapper around the same API. Non-technical users pick event types from a dropdown and paste their endpoint URL. Under the hood, it’s calling the same endpoints your customers’ automation uses.
Same API, two consumers. Customers can start with the dashboard to test, then graduate to API calls in their infrastructure-as-code.

The management plane handles:
- CRUD operations: Create, read, update, delete webhook subscriptions
- Secret rotation: Generate new signing secrets without downtime
- Validation: Verify endpoint URLs are reachable before saving
- Audit logging: Track who changed what, when
Webhook Registration API
import gleam/crypto
import gleam/bit_array

pub type WebhookRegistration {
  WebhookRegistration(
    id: String,
    url: String,
    secret: String,
    events: List(String),       // ["order.*", "payment.completed"]
    filter: Option(String),     // Optional JMESPath filter
  )
}

/// Register a new webhook destination
pub fn register_webhook(url: String, events: List(String)) {
  use _ <- result.try(validate_url(url))

  let secret = crypto.strong_random_bytes(32) |> bit_array.base64_encode(True)

  webhooks.insert(WebhookRegistration(
    id: uuid.v4(),
    url: url,
    secret: secret,
    events: events,
    filter: None,
  ))
}

/// Route event to all matching webhooks (recipient list)
pub fn route_event(event: Event) {
  webhooks.find_matching(event.type_)
  |> list.filter(fn(wh) { matches_filter(wh.filter, event) })
  |> list.each(fn(wh) { queue_delivery(wh, event) })
}

fn matches_filter(filter: Option(String), event: Event) -> Bool {
  case filter {
    None -> True
    Some(expr) -> jmespath.matches(expr, event.data)
  }
}
Event Filtering Examples
Clients can subscribe to specific event patterns:
{
  "url": "https://myapp.com/webhooks/orders",
  "events": ["order.created", "order.updated"],
  "filter": null
}
Or use JSONPath/JMESPath expressions for fine-grained filtering:
{
  "url": "https://myapp.com/webhooks/high-value",
  "events": ["order.completed"],
  "filter": "data.total_amount > `10000`"
}
{
  "url": "https://myapp.com/webhooks/us-orders",
  "events": ["order.*"],
  "filter": "data.shipping_address.country == 'US'"
}
From Webhooks to Enterprise Event Platform
Webhooks give developers full flexibility to build custom integrations. But not every customer has developers, and not every integration needs custom code.
Once you have the webhook delivery infrastructure, you can bundle convenience integrations for popular destinations. Customers configure credentials through your UI, and events flow automatically:
S3 Export: Customer provides an IAM role ARN with write access to their bucket. Your platform assumes the role and writes events directly. No code required.
Snowflake/BigQuery: Customer enters warehouse credentials and target table. Events land in their data warehouse for analytics, ready to join with their other business data.
Datadog/Splunk: Customer pastes an API key. Events appear in their existing monitoring dashboards alongside infrastructure metrics.
Which integrations should you build first? Look at your webhook logs. Which destinations are customers already sending events to? If 40% of your webhooks point to *.snowflakecomputing.com, that’s your signal. Build bundled integrations for where customers are already going, not where you think they should go.
This is the split: convenience integrations serve customers who want turnkey solutions, while webhooks serve customers with developers who need custom behavior. Same Recipient List infrastructure, different audiences.
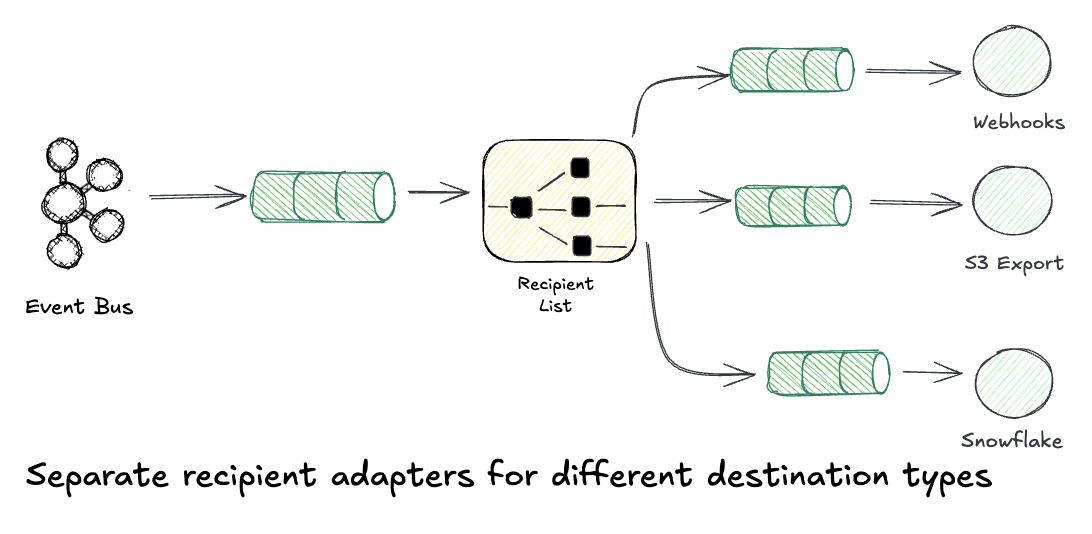
Each destination is just another adapter in the Recipient List:
/// Destination types - webhooks for custom, bundled for convenience
pub type Destination {
  // Developer-configured: full flexibility
  Webhook(url: String, secret: String)

  // Customer-configured: just credentials, we handle the rest
  S3Export(role_arn: String, bucket: String, prefix: String)
  Snowflake(connection_string: String, table: String)
  Datadog(api_key: String, source: String)
}

fn deliver(event: Event, dest: Destination) {
  case dest {
    Webhook(url, secret) ->
      webhook.send(url, event, secret)

    S3Export(role_arn, bucket, prefix) ->
      // Assume customer's IAM role, write to their bucket
      aws.assume_role(role_arn)
      |> s3.put_object(bucket, prefix <> "/" <> event.id <> ".json", event)

    Snowflake(conn, table) ->
      snowflake.insert(conn, table, event)

    Datadog(api_key, source) ->
      datadog.send_event(api_key, source, event)
  }
}
This is how platforms like Segment, Zapier, and Stripe built their integration ecosystems. Webhooks are just the first adapter type.
Enabling the Integration Ecosystem
Here’s where it gets interesting: if you implement subscription-based webhooks (REST hooks), platforms like Zapier can automatically integrate with your API. Instead of users manually copying webhook URLs, Zapier’s platform subscribes and unsubscribes programmatically.
What Zapier needs from your API:
POST /webhooks/subscribe- create a subscription with a target URLDELETE /webhooks/{id}- remove a subscription- Webhook deliveries to the subscribed URL
That’s it. With these three endpoints, your platform becomes a trigger source in Zapier, instantly connecting your users to 5,000+ apps without building individual integrations.
Platforms with excellent subscription webhook implementations:
- Stripe - the gold standard, with event filtering, retry logic, and detailed delivery logs
- GitHub - supports organization-wide and repository-level subscriptions with fine-grained event selection
- Shopify - subscription API with HMAC verification and mandatory webhook compliance for apps
Study these implementations. They’ve solved the edge cases you’ll encounter: duplicate deliveries, ordering guarantees, payload size limits, and versioning.
Pattern Summary
We’ve traced the full arc from a blocking HTTP call to an enterprise event platform. Each pattern builds on the last:
- Sync Request-Reply
- Fast operations, simple integrations. Client blocks, server responds.
- Scatter-Gather
- Aggregating from multiple sources. Parallelize behind a sync facade.
- Correlation Identifier
- Matching responses to requests. The thread connecting async interactions.
- Polling Consumer
- Async jobs, simple clients. Client checks status periodically.
- Return Address
- Webhooks, push notifications. Request includes where to send the reply.
- Recipient List
- Multi-destination delivery. Route to a dynamic list of receivers.
What’s Next
We’ve been assuming the happy path. What happens when webhooks fail? When endpoints go down? When rate limits kick in?
Tomorrow in Day 8, we’ll build the reliability layer:
| Pattern | What It Solves |
|---|---|
| Retry with Exponential Backoff | Don’t hammer failing endpoints |
| Dead Letter Queue | Capture failures for inspection and replay |
| Circuit Breaker | Stop sending to unhealthy endpoints |
| Claim Check | Lightweight webhooks, reduce bandwidth 80-95% |
| Aggregator | Batch events, reduce connection overhead 90% |
| Signature Verification | Prove webhook authenticity |
These patterns compose into production-grade delivery pipelines. See you then! 🎄
This post is part of the Advent of Enterprise Integration Patterns series. Check out the introduction or follow along with the enterprise-integration-patterns tag. All patterns referenced are from the classic book Enterprise Integration Patterns by Gregor Hohpe and Bobby Woolf.
A note on AI usage: I used Claude as a writing assistant for this series, particularly for generating code samples that illustrate the patterns. The patterns, architectural insights, and real-world experiences are mine. I believe in transparency about these tools.